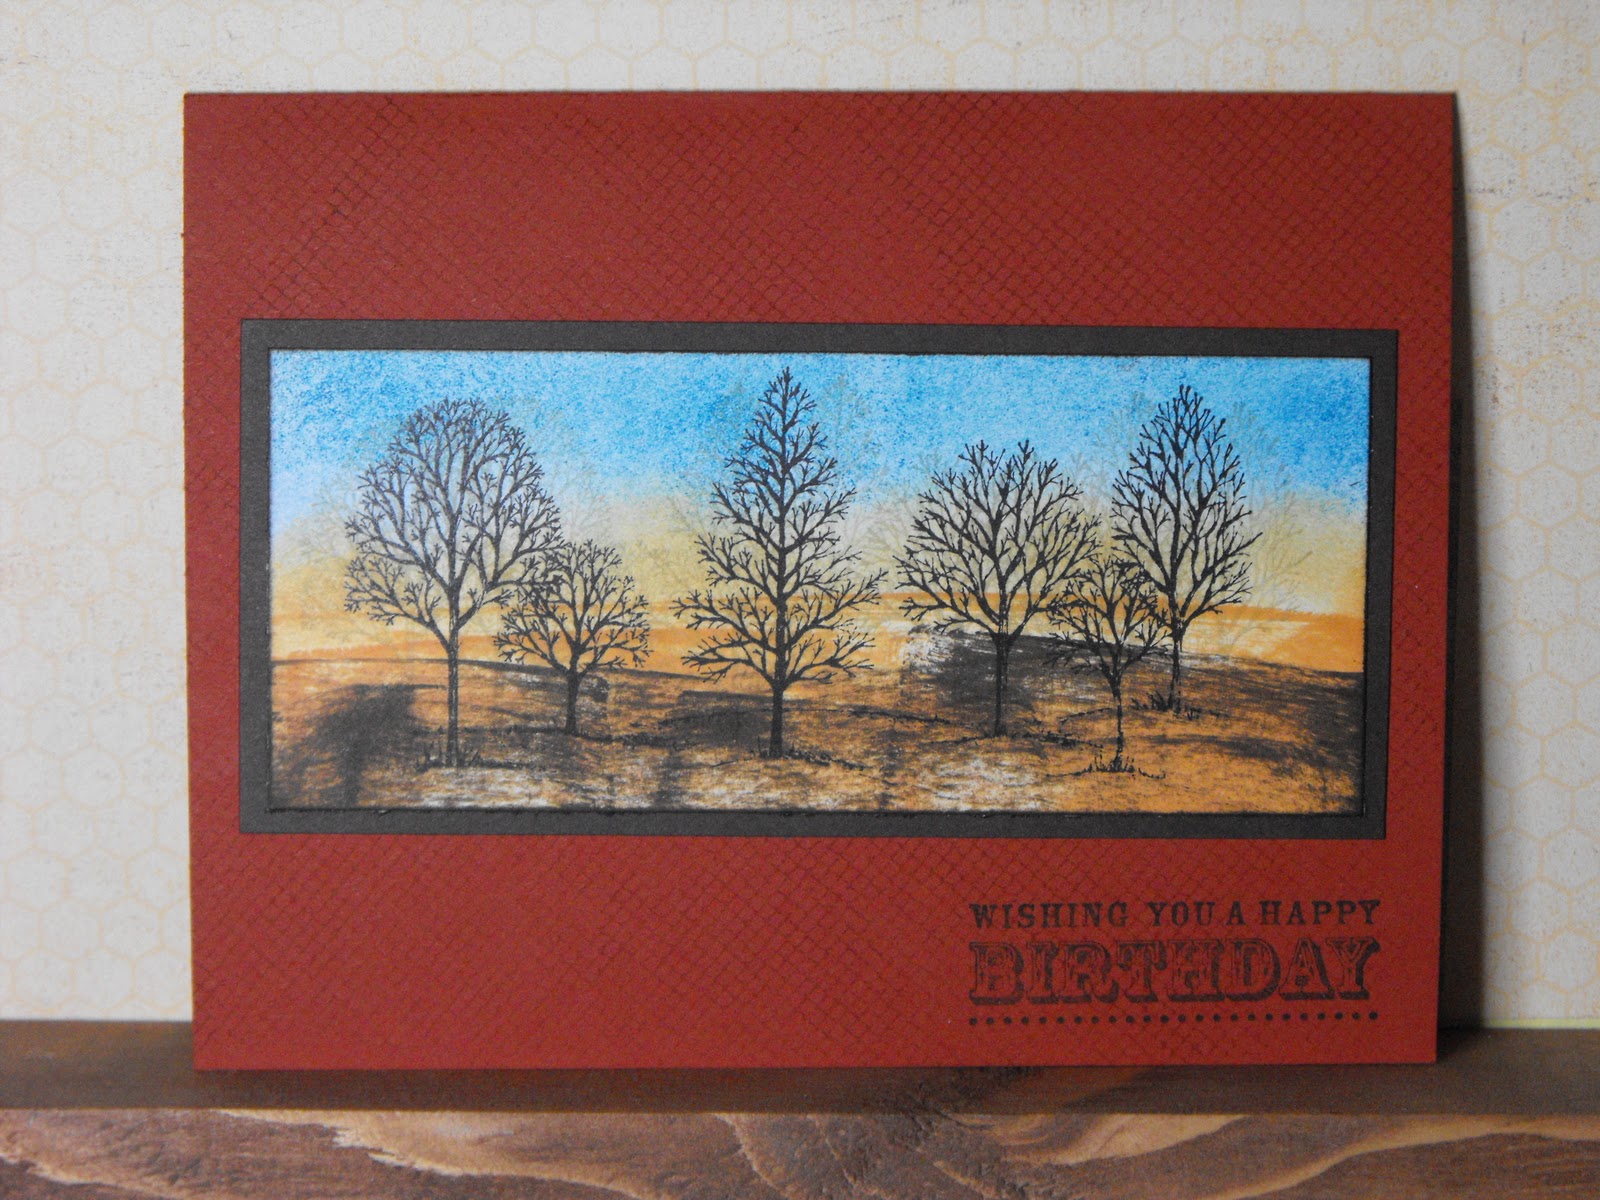
Every stamper has a set she finds herself constantly using. It's a sign of a good stamp set when you find one that can fit almost every occasion and is suitable for either feminine or masculine type cards. My go-to set is Lovely as a Tree. I recently had an order for a masculine birthday card and while I was blog-surfing I came across a card using this set with a sponged and direct-to-paper technique background. I can't remember now whose blog I saw it on but she had mounted the image on Whisper White, which looked very nice. While I used the same colours on the image, I decided to mount mine on darker colours.
To make this image, I first sponged the sky area, using Bashful Blue and Pacific Point on Whisper White cardstock. Then I stamped the image using Stazon Black. For the bottom part, I took the Peach Parfait Classic Stampin Pad and swiped it randomly across the cardstock. On top of that I did the same thing with Early Espresso. Finally, I sponged a bit of Peach Parfait on the area between the sky and ground.
Then I mounted it on Early Espresso and used Cajun Craze for the base. The sentiment is stamped in Early Espresso. Before placing the image panel, I used the Netting Background stamp inked with Cajun Craze to create some texture on the card base. I love the Netting BG stamp! It's new and now maybe I can part with the long-retired Canvas BG stamp that was so great. Or not!
Thursday, December 1, 2011
Tuesday, November 29, 2011
It's all about Christmas!
After about a year of thinking about and searching for somewhere to hold classes, I finally am in business! It's not that there were not a lot of places that I could rent. The problem was the cost of renting space was so high, that I could not figure out how to do it in order to keep the cost of a class reasonable and not lose money on it.
When I started a new job earlier this year at a motel/dining room complex, I immediately thought that The Salish Sea room would be perfect for holding classes! So, in October I finally had enough names on my e-mail list to offer a class. I was thrilled to get six responses!! OK, one was my Mom. This is my tables all set up, waiting for stampers. The lighting looks a bit green and dark here, but it really wasn't! The windows at the end look out onto the ocean. It was starting to get dark and I can't wait until the days get longer and we have that gorgeous view to inspire us! I was going to take pictures of the group once they got started, but I got so engrossed in everything I totally forgot!
One thing I had been hearing from the stampers I've met here is that they want to learn techniques. So I designed four cards, two of them Christmas themed, using embossing folders. I demonstrated two embossing techniques: Inlaid Embossing and the Bisque Technique. I also showed them how to use an Embosslit. Everyone said they loved the projects and were excited that they learned new techniques. Here is what they made:
Cardstock: Crumb Cake, Cherry Cobbler, Not Quite Navy, Whisper White, Lucky Limeade, Confetti Cream
Ink: Garden Green, Not Quite Navy, Early Espresso, Crumb Cake
Stamps: Bells & Boughs, Teeny Tiny Wishes, Delightful Decorations, Happiest Birthday Wishes
Tools: Ornament Punch, Decorative Label Punch, Square Lattice embossing folder, Vintage Wallpaper embossing folder, sponge
Other: Mini Jingles Bells, Crumb Cake seam binding, Frostwood Lodge DSP, Mini Glue Dots, Dimensionals, Tombow multi-purpose glue, Wood Sheets
For November's class, I decided to make it All About Christmas. I designed a card, a treat holder and an assortment of gift tags. It was a smaller group this time - only three - but we had lots of fun! This is the card we did, using the paper piecing technique for the snowman's body:
I call him the Flannel Snowman because the Frostwood Lodge Designer Series Paper makes me think of flannel shirts! Here's what I used to make this:
Cardstock: Cherry Cobbler, Whisper White
Ink: Stazon Black, markers in Cherry Cobbler, Crumb Cake, Pumpkin Pie, Pool Party, Black
Stamps: Snow Much Fun
Tools: Decorative Label Punch, Paper Snips
Other: Frostwood Lodge DSP
Of course I had to use the Bigz L Die, Holiday Stocking, and the 1" x 8" cello bags to make a treat holder. The cuff, toe and heel are cut from the Holly Berry Bouquet DSP using the glitter polka dots. The monogram 'G' was done with my brand new set of Timeless Type Alphabet Junior Sizzlets. I used the Top Note and Two Tags dies for the gift cards. They are totally CASE'D from all the talented Stampin Up demos who graciously share their work on our demo-only web site.
These projects used:
Cardstock: Cherry Cobbler (are you noticing a theme here with the Cherry Cobbler? I love this cardstock and it is the perfect Christmas red!), Naturals Ivory
Ink: Soft Suede, Cherry Cobbler, Crumb Cake, Always Artichoke
Stamps: Christmas Postcard, Bells & Boughs, Four Frames
Tools: Big Shot, Holiday Stocking Die, Two Tags Die, Timeless Type Alphabet Junior Sizzlets, Round Tab Punch, Crop-a-Dile, sponge
Other: Antique Brads, Crochet Trim, Holly Berry Bouquet DSP, 1" X 8" cello bags, Tombow multi-purpose glue
Just a note here about the Timeless Type Alphabet set. I have been wanting an alphabet set for a looooong time! Last year, Stampin Up decided to spoil its demos some more by giving us an extra discount on one item in our birthday month. My birthday was in October and I jumped at the chance to finally get an alphabet set!! I'm now busy researching ideas for using it in a class.
Well! This was a super-long post. I guess that's what happens when I don't post regularly. I hope some of my ideas inspire you to get working on your Christmas projects!
When I started a new job earlier this year at a motel/dining room complex, I immediately thought that The Salish Sea room would be perfect for holding classes! So, in October I finally had enough names on my e-mail list to offer a class. I was thrilled to get six responses!! OK, one was my Mom. This is my tables all set up, waiting for stampers. The lighting looks a bit green and dark here, but it really wasn't! The windows at the end look out onto the ocean. It was starting to get dark and I can't wait until the days get longer and we have that gorgeous view to inspire us! I was going to take pictures of the group once they got started, but I got so engrossed in everything I totally forgot!
One thing I had been hearing from the stampers I've met here is that they want to learn techniques. So I designed four cards, two of them Christmas themed, using embossing folders. I demonstrated two embossing techniques: Inlaid Embossing and the Bisque Technique. I also showed them how to use an Embosslit. Everyone said they loved the projects and were excited that they learned new techniques. Here is what they made:
Cardstock: Crumb Cake, Cherry Cobbler, Not Quite Navy, Whisper White, Lucky Limeade, Confetti Cream
Ink: Garden Green, Not Quite Navy, Early Espresso, Crumb Cake
Stamps: Bells & Boughs, Teeny Tiny Wishes, Delightful Decorations, Happiest Birthday Wishes
Tools: Ornament Punch, Decorative Label Punch, Square Lattice embossing folder, Vintage Wallpaper embossing folder, sponge
Other: Mini Jingles Bells, Crumb Cake seam binding, Frostwood Lodge DSP, Mini Glue Dots, Dimensionals, Tombow multi-purpose glue, Wood Sheets
For November's class, I decided to make it All About Christmas. I designed a card, a treat holder and an assortment of gift tags. It was a smaller group this time - only three - but we had lots of fun! This is the card we did, using the paper piecing technique for the snowman's body:
I call him the Flannel Snowman because the Frostwood Lodge Designer Series Paper makes me think of flannel shirts! Here's what I used to make this:
Cardstock: Cherry Cobbler, Whisper White
Ink: Stazon Black, markers in Cherry Cobbler, Crumb Cake, Pumpkin Pie, Pool Party, Black
Stamps: Snow Much Fun
Tools: Decorative Label Punch, Paper Snips
Other: Frostwood Lodge DSP
Of course I had to use the Bigz L Die, Holiday Stocking, and the 1" x 8" cello bags to make a treat holder. The cuff, toe and heel are cut from the Holly Berry Bouquet DSP using the glitter polka dots. The monogram 'G' was done with my brand new set of Timeless Type Alphabet Junior Sizzlets. I used the Top Note and Two Tags dies for the gift cards. They are totally CASE'D from all the talented Stampin Up demos who graciously share their work on our demo-only web site.
These projects used:
Cardstock: Cherry Cobbler (are you noticing a theme here with the Cherry Cobbler? I love this cardstock and it is the perfect Christmas red!), Naturals Ivory
Ink: Soft Suede, Cherry Cobbler, Crumb Cake, Always Artichoke
Stamps: Christmas Postcard, Bells & Boughs, Four Frames
Tools: Big Shot, Holiday Stocking Die, Two Tags Die, Timeless Type Alphabet Junior Sizzlets, Round Tab Punch, Crop-a-Dile, sponge
Other: Antique Brads, Crochet Trim, Holly Berry Bouquet DSP, 1" X 8" cello bags, Tombow multi-purpose glue
Just a note here about the Timeless Type Alphabet set. I have been wanting an alphabet set for a looooong time! Last year, Stampin Up decided to spoil its demos some more by giving us an extra discount on one item in our birthday month. My birthday was in October and I jumped at the chance to finally get an alphabet set!! I'm now busy researching ideas for using it in a class.
Well! This was a super-long post. I guess that's what happens when I don't post regularly. I hope some of my ideas inspire you to get working on your Christmas projects!
Thursday, October 20, 2011
Still playing with watercolour!
I think I got a little carried away with this one! While I love this stamp from the Peace Within set on its own, I was picturing it with a mountain scene behind it. And of course, I couldn't resist adding some water. Since I was using watercolour paper, I thought I would try using my Aquapainter and some Basic Grey ink to draw some mountains. Now, I have to say in my defense that I have never called myself an artist! Think I need a little more practice.
Thursday, July 21, 2011
I love embossing folders!
I love flower stamps and I love embossing folders. So when I saw the Flower Garden embossing folder in the Summer Mini, it was at the top of my wish list. It's fun to colour the embossed image by just rubbing colour on with a sponge dauber.
Here's what I used:
Stamps: Four Frames, Teeny Tiny Wishes
Paper: Wild Wasabi, Whisper White, Confetti White
Ink: Pear Pizzaz, Peach Parfait, Daffodil Delight, Marina Mist, Pacific Point
Other: Flower Garden embossing folder, Decorative Label punchYou can still order from the Summer Mini until August 31. Just click on the picture of the mini on the right!
Thursday, June 9, 2011
Stuck on Nautical
I'm loving all the nautically-themed products in the Summer Mini! It could be because I now live so close to the ocean. But, even when I lived in the land-locked prairies, I was drawn to anything to do with water, whether it was lakes or oceans. I attribute this affinity to my paternal grandmother who was Norwegian.
The stamp set The Open Sea, pairs well with the Nautical Expedition Designer Series Paper to make manly-themed cards. Add a bit of Baker's Twine and the possibilities are endless!
This is what I used:
Stamps: The Open Sea, French Foliage (for the splatters), Teeny Tiny Wishes (for the sentiment)
Paper: Not Quite Navy, Confetti Cream (crumpled and crimped until it split into layers), Nautical Expedition DSP
Ink: Not Quite Navy
Accessories: Modern Label punch, sponge, crimper, White Baker's Twine (rolled over the Not Quite Navy stamp pad to pick up some colour), Cutter Kit (has a tool that easily roughs up the edges, which is what I did on the main image panel)
Tuesday, June 7, 2011
Strength & Hope
One of Stampin' Up's mandates is "Making a Difference". In this year's Summer Mini-Catalogue, $2 from the sale of each Strength & Hope stamp set is being donated to The Breast Cancer Research Foundation. I used the butterfly image from this set to make a birthday card for a co-worker. She likes colour so I used Concord Crush, Old Olive and Regal Rose.
Three stamp sets went into the making of this card: Strength & Hope, Swirls & Curls Verses (Level 1 Hostess Set from the Summer Mini) and Vintage Vogue for the vine and flower images.
To see more about this stamp set and the Making a Difference promotion, just click on the image of the Summer Mini Catalogue to the right.
Three stamp sets went into the making of this card: Strength & Hope, Swirls & Curls Verses (Level 1 Hostess Set from the Summer Mini) and Vintage Vogue for the vine and flower images.
Cardstock: Old Olive, Concord Crush, Whisper White
Ink: Concord Crush, Old Olive, Regal Rose, Basic Black and tiny bit of Daffodil Delight
Accessories: Dotted Scallop Ribbon Border punch, marker, Dimensionals
Sunday, June 5, 2011
More Watercolour!
When I first saw this stamp in the Summer Mini I immediately pictured a watercolour background for it. My Aquapainter is always on my work table, filled and ready for use. It's fast becoming my most used tool! And the Framed Tulips embossing folder makes the perfect frame for any work of art.
The first step was to stamp the sailboat image on Watercolour paper using Stazon black ink. I use Stazon because it is water proof and won't run when I use the Aquapainter. Next I started building the background by just picking up the ink with the Aquapainter and creating shapes for the grassy hills. I add more ink and darker shades of ink wherever I want shadows or just more visual interest.
And this is what I ended up with!
This is what I used:
Stamps: Sail Away
Ink: Stazon black, Bashful Blue, Marina Mist, Old Olive, Always Artichoke, Soft Suede
Paper: Crumb Cake, Very Vanilla, Watercolour paper
Accessories: Aquapainter, markers, Big Shot, Framed Tulips embossing folder, sponge dauber
Subscribe to:
Posts (Atom)
WWC211 - Kath's Feminine Anything Goes Challenge
https://watercoolerchallenges.blogspot.com/ It's a feminine theme this week from Kath. A perfect opportunity to play with my new butte...
-
Spring is just around the corner! Although, I'm sure it doesn't feel like it in those areas that are still being hit by storms. ...
-
Wow! It's 2014. Not only do we have a new Wacky Watercooler Blog Hop, but we have a new seasonal catalogue and Sale-a-Bration co...
-
That's right - we are celebrating our 3rd Anniversary! Can you believe it? And we have all of the original Hoppers from that very firs...