Wednesday, December 21, 2016

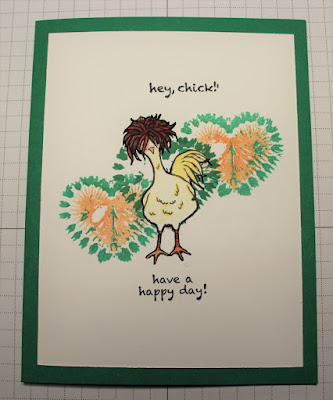
WWC99 - Marshas Clean & Simple Make it With Hearts Challenge


Welcome to our last challenge for 2016. Due to the Christmas holidays, this challenge will run for two  weeks,  ending January 2, 2017 at 5:00 p.m. Mountain Time.

Our host this week is Marsha, and she has chosen Clean & Simple Make it With Hearts. Clean & Simple means to use minimal layers and embellishments and to leave lots of open space.

Since I received my pre-order from the 2017 Occasions and Sale-A-Brations catalogues, I just had to play with new stuff and combined a set from the Occasions with a set from SAB.
The Occasions set is called Tie Dyed and the crazy-looking chicken is from an SAB set called Hey Chick. Both sets are going to be a lot of fun and I thought they looked well together.

I used Emerald Envy cardstock for the base and the images are stamped on Whisper White. The Tie Dyed set is a 3-part stamping set, meaning each image has three parts to it that are stamped separately and layered to form a multi-coloured image or an image with three shades of one colour ink.

I only used two of the heart images and stamped them in Emerald Envy and Peek-a-Boo Peach. The chicken is stamped with Archival Basic Black and coloured with a combination of markers and the brand new Stampin' Up Watercolour Pencils. I stamped him on a separate piece of Whisper White and fussy cut after colouring.

As you will see by what the other Watercooler Artists have done - visit Watercooler Wednesday - hearts can be used for occasions other than Valentine's Day. So pull out your favourite heart stamp and join the fun!

Wednesday, December 14, 2016

WWC98 Kath's Colour Challenge

http://watercoolerchallenges.blogspot.ca/
It's time for another Colour Challenge! And I have to say, I did find this challenging. Here's the colours chosen by Kath:
It is a gorgeous combo, isn't it? It did have me thinking Christmas, just because, well it's almost Christmas. But for some reason I wasn't picturing a card.

Then I thought about a treat holder I'm planning on making for each member of my family who will be getting together for Christmas dinner. And this is how it looks with these colours:
I followed a video made by Brenda Quintana, a fellow Stampin' Up demonstrator, who is a genius at coming up with the most inventive 3D items. These are really very easy and so quick to make!

The cardstock for the tree is Thick Whisper White, the star is cut from Gold Glimmer Paper, using the Star Framelits. For the trunk, I found a piece of Early Espresso in my scrap pile, that had been embossed. The silver foil wrapping on the Hershey Kisses fills the silver part of the colour challenge. And that's it!

Check out how the other Watercooler Artists handled this challenge, and then show us your stuff! Just visit the Watercooler Wednesday blog  to link up your project.
 

Wednesday, December 7, 2016

WWC97 - Penny's Sketch Challenge

https://watercoolerchallenges.blogspot.ca/
Welcome to Watercooler Wednesday and Penny's Sketch Challenge. Sketch  Challenges are always so  much fun because they can be any colour-scheme, any occasion - or no occasion - or just because. This is the sketch Penny has for us this week:

I thought this sketch would be perfect for featuring some Designer Series Paper. In every catalogue, there is one package of DSP that really catches my eye. For the 2016-2017 Annual Catalogue, there were so many awesome collections - but one really stood out for me: This Christmas.

For one thing, you get 24 12 X 12 double-sided sheets in this collection! It is a little lighter weight than normal, but that doesn't matter when using it on cards. But, the best thing about this collection is that there are 4 - yes, 4 of each pattern!

I've been steadily using this DSP, but had not yet cut into the black & white snowflake design. This was the perfect project to use it on.
 
It's not a Christmas card - more of a Winter card. And the creation of this card happened just a couple of days before we had a major snowfall! Well, it was major for this area, anyway. I live on the west coast of Canada, in the province of British Columbia. And snow is not a regular occurrence here.

I decided to keep this card to black & white. Well, the DSP is Basic Black and Very Vanilla, but Stampin' Up doesn't have Very Vanilla ink.

The word "glow" is from a stamp set I was so lucky to get when I attended OnStage Local in Vancouver, BC last month. It's called Love Sparkles and is in the 2017 Occasions Catalogue. Don't you just love the script-y look of it? I stamped it onto the Basic Black cardstock using Whisper White Craft Ink.

The sketchy-looking star and the little stars around the circle are from the same stamp set, also in Whisper White Craft Ink. It's cut with a circle die from the Stitched Shapes Framelits set.

For the glow-factor, I used Clear Wink of Stella around the edges of the die-cut circle and in the centres of some of the snowflakes on  the DSP.

Check out what the other Watercooler Artists have come up with and then show us your interpretation. Just visit the Watercooler Wednesday Blog to link up.

Wednesday, November 30, 2016

WWC96 - Gail's Special Fold Challenge

It's my turn to host this week's challenge. I decided to really challenge myself and pick something I don't do a lot of - Special Folds.
A special fold that is popular right now is one called Pop Up Panel. I have watched several videos showing how it is done, and the one I found the most easily followed was done by Dawn Griffith, also a Stampin' Up demonstrator.

Recently, one of my sisters was visiting, and it just happened to be her birthday while she was here. So I took the opportunity to make her a Special Fold birthday card.

Here is the front:
I also dug into my hoard - uh - stash of favourite retired cardstock to use for the cardbase and ink. Lost Lagoon is just the best shade of blue! And it goes really well with the silver foil dotted pattern from the Halloween Night Specialty Designer Series Paper.

The image is stamped on Whisper White cardstock, using Lost Lagoon and Archival Basic Black inks. The images are from Touches of Texture and the sentiment is from Rose Wonder. I used markers in Daffodil Delight and Old Olive to colour the flowers and leaves.

Are you ready to see the inside?
My sister loves cats, so it was a purr-fect chance to use the Pretty Kitty stamp set. It took a variety of markers to colour each panel as I wanted each kitty to be a different colour. The grass image is from Sitting Here.

Here is a close-up of the kitties:
This really was a fun card to make and I hope you will give it a try. Or, any one of the other fantastic fold projects done by the other Watercooler Artists you can see at the Watercooler Wednsday Blog.

Wednesday, November 23, 2016

WWC95 - Libby's Masculine Challenge

http://watercoolerchallenges.blogspot.ca/
It's time for another Masculine Challenge, hosted this week  by Libby. The theme is "Anything Goes". That leaves it wide open to do anything you want. Can be any colour scheme, for any occasion. Doesn't even have to be a card. You could do a 3-D item, such as a gift box or a framed home-decor piece.
I decided to do a Christmas card and had a clear idea of how I wanted it to look. Even though it is a simple design and uses only stamps and ink, I did use 4 different stamp sets and 2 different techniques to make it.
The techniques are Masking and Off-set Stamping. For the masking technique, I stamped the car image from Guy Greetings onto a piece of scrap paper and cut it out. After placing it where I wanted it on the Crumb Cake card stock, I inked up the trio of trees from a retired stamp set (wish it hadn't retired!) from last year's Holiday Catalogue - Wonderland, with Always Artichoke ink and stamped to look like they are behind the car.

With the mask still in place, I cleaned off the stamp and re-inked it with Whisper White Craft ink. I didn't want to stamp the Whisper White image right over-top the Always Artichoke, so I move it slightly so the green would still show and the white ink would like like snow sitting on top of the branches.

Craft ink doesn't dry quickly, so I gave it a few minutes to make sure it was completely dry. After removing the mask, I stamped the car image into its spot using Early Espresso ink. Then I stamped a few random snowflakes with WW Craft, using the snowflakes stamp from the Christmas Pines stamp set.

I also used 3 different mediums for the white areas of this design. As well as the WW Craft ink, I coloured the snow under the car with the Whisper White Watercolour Pencil from the brand new Watercolour Pencil collection that will be available in the 2017 Occasions Catalogue. So happy we have Watercolour Pencils back!

To do the snow on the car, I used a Krylon White Paint Pen. I've been dabbling in Mixed Media and watching a lot of videos on YouTube - a lot! Many of the artists use paint pens, so I went looking for some to try out. I also have a Sharpie White Paint Pen, but it soaked into the cardstock - not the effect I was going for. Here's a close-up of the car:

The sentiment, also in Early Espresso, is from another sadly retired set - Endless Whishes. As a finishing touch, a bit of Clear Wink of Stella on the windows gives them a frosted look. Also, I sponged the edges with more WW Craft ink and then mounted the image panel with Dimensionals onto a Whisper White Thick card base.

I'm really liking the vintage-y look of this and think it could also work well for the men in ones life who have winter birthdays.

To see the wonderful project done by the other Watercooler Artists, visit the Watercooler Wednesday Challenge Blog. You have until Monday to link up your project. We hope you will play along - we love to see all the creativity!
 

Thursday, November 17, 2016

All About Christmas

http://wackywatercoolerstamping.blogspot.com
Since this is our last Blog Hop of 2016, we are going all out for Christmas!

If you are following the Hop line-up, you have arrived here from Marie's blog. I'm sure you are as impressed by her creations as I am!

My first project uses my favourite pattern from the Serene Scenery Paper Stack. I thought it made the perfect background for a wreath made with the Pretty Pines Thinlits dies.
I cut the pine boughs from the Garden Green patterned paper from the This Christmas Designer Series Paper. It was really easy to shape into the wreath form. The bow is also cut from the Real Red pattern from This Christmas DSP. And the holly branches are Real Red cardstock. I stamped the sentiment from the co-ordinating stamp set, Christmas Pines in Real Red ink on Whisper White cardstock.

Can you see the sparkles? They are the white mica flakes - so much fun! I also stamped some little snowflakes with the snowflake image from Christmas Pines using Craft White ink. Here's a close-up:
Next up is a card using the first Christmas set I got from this awesome 2016 Holiday Catalogue - Father Christmas. And I just had to use the brand new Watercolour Pencils in Stampin' Up! colours!! Yay! Look for them in January in the 2017 Occasions Catalogue.
Father Christmas is stamped with Staz-on Black on Very Vanilla and totally coloured with the Watercolour Pencils: Real Red, Basic Black, Early Espresso, Old Olive, Daffodil Delight, Melon Mambo and Basic Grey. I used a white gel pen for his beard and the trim on his robe.
I wanted Father Christmas to be the focal point, so I cut out the image with our brand new Stitched Shapes framelits. These are a must-have! Then I layered it onto a bigger oval in Dapper Denim, cut with the Layering Ovals framelits.

Then, I used the holly branch to stamp randomly in Dapper Denim on Very Vanilla. I think it kind of looks like Toile and I love how it looks backed by the Dapper Denim card base.

For my third project, I went to the Christmas Pines stamp set. This set has so many elements to it, making it so fun to use. And this design was so quick to do, I had to do two versions:


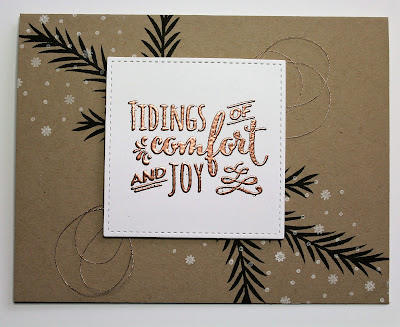
I stamped the pine bough image in Always Artichoke right onto the Crumb Cake card bases and added some snowflakes using Craft Whisper White.

The tidings of comfort and joy sentiment is embossed with Copper Embossing Powder on Whisper White card stock, then cut out with the Stitched Shapes Framelits. You can see a little bit of Copper Wire peeking out from the corners.
For the other sentiment, I used the Real Red Glitter Embossing powder, again on Whisper White, also cut with Stitched Shapes Framelits.
I really can't decide which of all these projects I would pick as a favourite. I love them all! And I hope you like them too.

Now you're off to see what Jean has prepared for you. I know you will love her projects! Just click on the 'Next' button below to go to her blog.


The 'Previous' button will take you back to Marie and the 'Home' button will take you to the Wacky Watercooler Stamping home blog.

https://jlfstudio.wordpress.comhttp://mytanglewoodcottage.blogspot.comhttp://wackywatercoolerstamping.blogspot.com

WWC211 - Kath's Feminine Anything Goes Challenge

https://watercoolerchallenges.blogspot.com/ It's a feminine theme this week from Kath. A perfect opportunity to play with my new butte...