If you're following the Hop in order, I am first in the line-up. If you joined somewhere along the way, then you may be coming from Heidi's blog. She always has the most amazing projects! Although we are in the same country, we live in different provinces. Just occured to me - we each now live in the other's current province! Did I just confuse you?
Here in Canada, we have already celebrated Thanksgiving. However, there is nothing seasonal about needing thank you cards. An array of lovely leaves in their autumn splendor makes a great thank you card.
This was so fun and easy to do. I picked three inks - Cajun Craze, Pumpkin Pie and Tangerine Tango - to stamp the leaf image from Vintage Leaves onto a strip of Watercolour Paper. I did one at time and after stamping each one, immediately went over the whole thing with my Aquapainter to spread the ink. Along the edges, I used the same technique with another image from the same set, in Garden Green ink.
A light wash of Sahara Sand on the background and some shadows under the leaves gives everything some dimension. Mount the image on a panel of Cajun Craze cardstock, wrap some Linen Thread around it and then mount that onto a Thick Whisper White card base. The sentiment is from Thoughtful Banners, stamped in Cajun Craze.
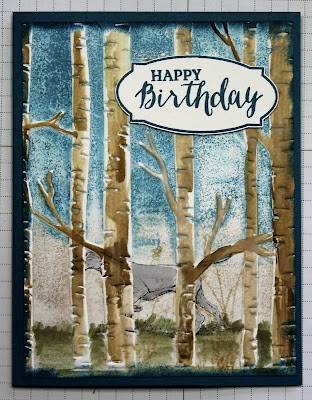
Next up is a fall-themed birthday card, using the Woodland Embossing Folder. This folder was such a hit when it was introduced in last year's Holiday Catalogue, that Stampin' Up! gave into all the clamouring from us demonstrators and brought it back in the 2016-2017 Annual Catalogue.
It is a keeper, for sure, so I just had to use it for this Hop!
This cool technique is one I first saw done by an incredibly creative Australian demonstrator, Ann Craig. First step is to put ink right onto the embossing folder. I used a brayer and put Tip Top Taupe on the bottom and Dapper Denim at the top. Next, I stamped the dog image from The Wilderness Awaits using Archival Black Ink - again, right onto the embossing folder.
Next, place a piece of Whisper White cardstock carefully into the EF, trying not to smear the ink, then run it through the Big Shot.
After embossing, I took my Aquapainter and went over the raised trees with Soft Suede. The dog is coloured with a Smoky Slate marker, and I added the green at the bottom with Always Artichoke.
I sponged the edges with Dapper Denim and mounted it onto a Dapper Denim card base. The sentiment and frame are from the Rose Wonder stamp set.
For my final project, I went back to Vintage Leaves. In going through my many boxes of crafting stuff after a move earlier this year, I came across some little grapevine wreaths I had picked up somewhere. It was time to finally use one!
I stamped three of the leaf images with Delightful Dijon ink onto Crushed Curry cardstock, then cut them out with the coordinating Leaflets Framelits. To give them some texture, I just scrunched them up and sponged the edges with Delightful Dijon. Glue dots hold them together at the top.
For embellishments, I strung three of the cute little Pinecone Embellishments from the 2016 Holiday Catalogue onto some Linen Thread and attached to the leaves with a glue dot. The bow on top is a few strands separated from the extra thick Crumb Cake cord that is also found in the 2016 Holiday Catalogue, as is the Copper Thread that is loosely looped over the Pinecones. A length of burlap ribbon makes the hanger.
Here's a close-up of all the details:
Now you're off to visit Marsha, one of our US hoppers. She is so inspiring and I know you will love her projects! Just click on the 'Next' button below to continue your journey.


.jpg)
Gail, beautiful projects. I really like the first card!!
ReplyDeleteThanks Jackie. It kind of came together all on its own - I had no idea what I was going to do when I started it.
DeleteWhat a great tribute to the Fall colours, Gail. I love all your projects. The Woodlands scene looks so realistic because of the raised trees and your wonderful colouring. But I got a kick out of your wreath. I had almost used a grapevine wreath which, like you, I had come across while sorting out my crafting room. And then I changed direction, choosing to create the burlap wall art instead. I'm so glad because it's nice to be different. And your wreath with those leaves is sensational. The leaves really look like real dried leaves. Well done.
ReplyDeleteGail, such beautiful projects, The first card took my breath away. Love all these beautiful creations.
ReplyDeleteBeautiful collection of autumn projects, Gail. Your thank you card is stunning, and I appreciate the directions. The masculine birthday card should be a hit--everyone struggles with these, and yours is beautiful. And that wreath? I could hang that in my home--just perfect!
ReplyDeleteGail, the colors you used in the thank you card really captured the fall colors, it is so pretty, I love the "ink to embossing folder" technique - what a great guy card. Your wreath is so fun - you and Heidi have inspired me to make an autumn wall hanging!
ReplyDeleteGail sorry I was unable to comment over the weekend but just wanted to let you know that I love all three of your projects. You've captured the beauty of Fall for sure with your first card. Those leaves are so vibrant, and in contrast your second card shows the more subtle shades of Autumn. Nice transition. Those three little leaves on your wreath are so realistic looking, how awesome! Thanks for sharing how you created all three.
ReplyDelete